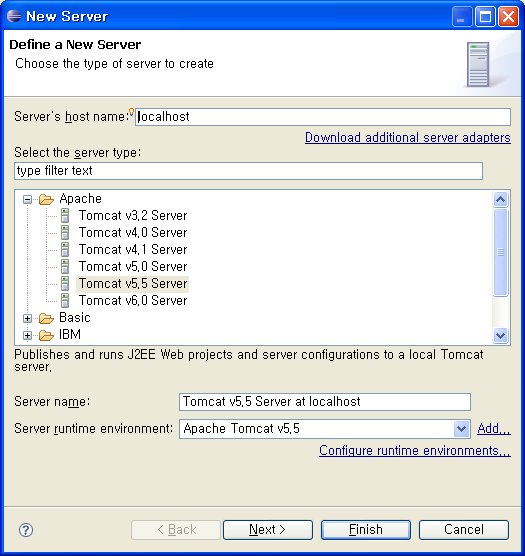
server.xml
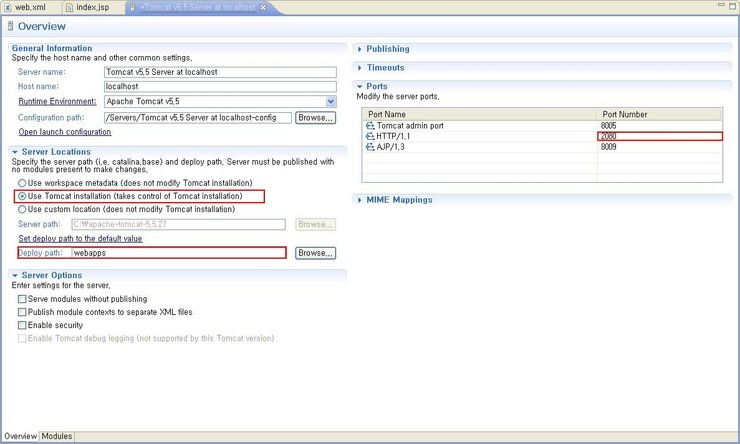
* 빨간색으로 강조한 것들에 대해서 POST번호를 바꿔준다.
<?xml version="1.0" encoding="UTF-8"?>
<!--
Licensed to the Apache Software Foundation (ASF) under one or more
contributor license agreements. See the NOTICE file distributed with
this work for additional information regarding copyright ownership.
The ASF licenses this file to You under the Apache License, Version 2.0
(the "License"); you may not use this file except in compliance with
the License. You may obtain a copy of the License at
http://www.apache.org/licenses/LICENSE-2.0
Unless required by applicable law or agreed to in writing, software
distributed under the License is distributed on an "AS IS" BASIS,
WITHOUT WARRANTIES OR CONDITIONS OF ANY KIND, either express or implied.
See the License for the specific language governing permissions and
limitations under the License.
-->
<!-- Example Server Configuration File -->
<!-- Note that component elements are nested corresponding to their
parent-child relationships with each other -->
<!-- A "Server" is a singleton element that represents the entire JVM,
which may contain one or more "Service" instances. The Server
listens for a shutdown command on the indicated port.
Note: A "Server" is not itself a "Container", so you may not
define subcomponents such as "Valves" or "Loggers" at this level.
-->
<Server port="2005" shutdown="SHUTDOWN">
<!-- Comment these entries out to disable JMX MBeans support used for the
administration web application -->
<Listener className="org.apache.catalina.core.AprLifecycleListener" />
<Listener className="org.apache.catalina.mbeans.ServerLifecycleListener" />
<Listener className="org.apache.catalina.mbeans.GlobalResourcesLifecycleListener" />
<Listener className="org.apache.catalina.storeconfig.StoreConfigLifecycleListener"/>
<!-- Global JNDI resources -->
<GlobalNamingResources>
<!-- Test entry for demonstration purposes -->
<Environment name="simpleValue" type="java.lang.Integer" value="30"/>
<!-- Editable user database that can also be used by
UserDatabaseRealm to authenticate users -->
<Resource name="UserDatabase" auth="Container"
type="org.apache.catalina.UserDatabase"
description="User database that can be updated and saved"
factory="org.apache.catalina.users.MemoryUserDatabaseFactory"
pathname="conf/tomcat-users.xml" />
</GlobalNamingResources>
<!-- A "Service" is a collection of one or more "Connectors" that share
a single "Container" (and therefore the web applications visible
within that Container). Normally, that Container is an "Engine",
but this is not required.
Note: A "Service" is not itself a "Container", so you may not
define subcomponents such as "Valves" or "Loggers" at this level.
-->
<!-- Define the Tomcat Stand-Alone Service -->
<Service name="Catalina">
<!-- A "Connector" represents an endpoint by which requests are received
and responses are returned. Each Connector passes requests on to the
associated "Container" (normally an Engine) for processing.
By default, a non-SSL HTTP/1.1 Connector is established on port 8080.
You can also enable an SSL HTTP/1.1 Connector on port 8443 by
following the instructions below and uncommenting the second Connector
entry. SSL support requires the following steps (see the SSL Config
HOWTO in the Tomcat 5 documentation bundle for more detailed
instructions):
* If your JDK version 1.3 or prior, download and install JSSE 1.0.2 or
later, and put the JAR files into "$JAVA_HOME/jre/lib/ext".
* Execute:
%JAVA_HOME%\bin\keytool -genkey -alias tomcat -keyalg RSA (Windows)
$JAVA_HOME/bin/keytool -genkey -alias tomcat -keyalg RSA (Unix)
with a password value of "changeit" for both the certificate and
the keystore itself.
By default, DNS lookups are enabled when a web application calls
request.getRemoteHost(). This can have an adverse impact on
performance, so you can disable it by setting the
"enableLookups" attribute to "false". When DNS lookups are disabled,
request.getRemoteHost() will return the String version of the
IP address of the remote client.
-->
<!-- Define a non-SSL HTTP/1.1 Connector on port 8080 -->
<Connector port="2020" maxHttpHeaderSize="8192"
maxThreads="150" minSpareThreads="25" maxSpareThreads="75"
enableLookups="false" redirectPort="8443" acceptCount="100"
connectionTimeout="20000" disableUploadTimeout="true" />
<!-- Note : To disable connection timeouts, set connectionTimeout value
to 0 -->
<!-- Note : To use gzip compression you could set the following properties :
compression="on"
compressionMinSize="2048"
noCompressionUserAgents="gozilla, traviata"
compressableMimeType="text/html,text/xml"
-->
<!-- Define a SSL HTTP/1.1 Connector on port 8443 -->
<!--
<Connector port="8443" maxHttpHeaderSize="8192"
maxThreads="150" minSpareThreads="25" maxSpareThreads="75"
enableLookups="false" disableUploadTimeout="true"
acceptCount="100" scheme="https" secure="true"
clientAuth="false" sslProtocol="TLS" />
-->
<!-- Define an AJP 1.3 Connector on port 8009 -->
<Connector port="2009"
enableLookups="false" redirectPort="8443" protocol="AJP/1.3" />
<!-- Define a Proxied HTTP/1.1 Connector on port 8082 -->
<!-- See proxy documentation for more information about using this. -->
<!--
<Connector port="8082"
maxThreads="150" minSpareThreads="25" maxSpareThreads="75"
enableLookups="false" acceptCount="100" connectionTimeout="20000"
proxyPort="80" disableUploadTimeout="true" />
-->
<!-- An Engine represents the entry point (within Catalina) that processes
every request. The Engine implementation for Tomcat stand alone
analyzes the HTTP headers included with the request, and passes them
on to the appropriate Host (virtual host). -->
<!-- You should set jvmRoute to support load-balancing via AJP ie :
<Engine name="Catalina" defaultHost="localhost" jvmRoute="jvm1">
-->
<!-- Define the top level container in our container hierarchy -->
<Engine name="Catalina" defaultHost="localhost">
<!-- The request dumper valve dumps useful debugging information about
the request headers and cookies that were received, and the response
headers and cookies that were sent, for all requests received by
this instance of Tomcat. If you care only about requests to a
particular virtual host, or a particular application, nest this
element inside the corresponding <Host> or <Context> entry instead.
For a similar mechanism that is portable to all Servlet 2.4
containers, check out the "RequestDumperFilter" Filter in the
example application (the source for this filter may be found in
"$CATALINA_HOME/webapps/examples/WEB-INF/classes/filters").
Note that this Valve uses the platform's default character encoding.
This may cause problems for developers in another encoding, e.g.
UTF-8. Use the RequestDumperFilter instead.
Also note that enabling this Valve will write a ton of stuff to your
logs. They are likely to grow quite large. This extensive log writing
will definitely slow down your server.
Request dumping is disabled by default. Uncomment the following
element to enable it. -->
<!--
<Valve className="org.apache.catalina.valves.RequestDumperValve"/>
-->
<!-- Because this Realm is here, an instance will be shared globally -->
<!-- This Realm uses the UserDatabase configured in the global JNDI
resources under the key "UserDatabase". Any edits
that are performed against this UserDatabase are immediately
available for use by the Realm. -->
<Realm className="org.apache.catalina.realm.UserDatabaseRealm"
resourceName="UserDatabase"/>
<!-- Comment out the old realm but leave here for now in case we
need to go back quickly -->
<!--
<Realm className="org.apache.catalina.realm.MemoryRealm" />
-->
<!-- Replace the above Realm with one of the following to get a Realm
stored in a database and accessed via JDBC -->
<!--
<Realm className="org.apache.catalina.realm.JDBCRealm"
driverName="org.gjt.mm.mysql.Driver"
connectionURL="jdbc:mysql://localhost/authority"
connectionName="test" connectionPassword="test"
userTable="users" userNameCol="user_name" userCredCol="user_pass"
userRoleTable="user_roles" roleNameCol="role_name" />
-->
<!--
<Realm className="org.apache.catalina.realm.JDBCRealm"
driverName="oracle.jdbc.driver.OracleDriver"
connectionURL="jdbc:oracle:thin:@ntserver:1521:ORCL"
connectionName="scott" connectionPassword="tiger"
userTable="users" userNameCol="user_name" userCredCol="user_pass"
userRoleTable="user_roles" roleNameCol="role_name" />
-->
<!--
<Realm className="org.apache.catalina.realm.JDBCRealm"
driverName="sun.jdbc.odbc.JdbcOdbcDriver"
connectionURL="jdbc:odbc:CATALINA"
userTable="users" userNameCol="user_name" userCredCol="user_pass"
userRoleTable="user_roles" roleNameCol="role_name" />
-->
<!-- Define the default virtual host
Note: XML Schema validation will not work with Xerces 2.2.
-->
<Host name="localhost" appBase="webapps"
unpackWARs="true" autoDeploy="true"
xmlValidation="false" xmlNamespaceAware="false">
<!-- Defines a cluster for this node,
By defining this element, means that every manager will be changed.
So when running a cluster, only make sure that you have webapps in there
that need to be clustered and remove the other ones.
A cluster has the following parameters:
className = the fully qualified name of the cluster class
clusterName = a descriptive name for your cluster, can be anything
mcastAddr = the multicast address, has to be the same for all the nodes
mcastPort = the multicast port, has to be the same for all the nodes
mcastBindAddress = bind the multicast socket to a specific address
mcastTTL = the multicast TTL if you want to limit your broadcast
mcastSoTimeout = the multicast readtimeout
mcastFrequency = the number of milliseconds in between sending a "I'm alive" heartbeat
mcastDropTime = the number a milliseconds before a node is considered "dead" if no heartbeat is received
tcpThreadCount = the number of threads to handle incoming replication requests, optimal would be the same amount of threads as nodes
tcpListenAddress = the listen address (bind address) for TCP cluster request on this host,
in case of multiple ethernet cards.
auto means that address becomes
InetAddress.getLocalHost().getHostAddress()
tcpListenPort = the tcp listen port
tcpSelectorTimeout = the timeout (ms) for the Selector.select() method in case the OS
has a wakup bug in java.nio. Set to 0 for no timeout
printToScreen = true means that managers will also print to std.out
expireSessionsOnShutdown = true means that
useDirtyFlag = true means that we only replicate a session after setAttribute,removeAttribute has been called.
false means to replicate the session after each request.
false means that replication would work for the following piece of code: (only for SimpleTcpReplicationManager)
<%
HashMap map = (HashMap)session.getAttribute("map");
map.put("key","value");
%>
replicationMode = can be either 'pooled', 'synchronous' or 'asynchronous'.
* Pooled means that the replication happens using several sockets in a synchronous way. Ie, the data gets replicated, then the request return. This is the same as the 'synchronous' setting except it uses a pool of sockets, hence it is multithreaded. This is the fastest and safest configuration. To use this, also increase the nr of tcp threads that you have dealing with replication.
* Synchronous means that the thread that executes the request, is also the
thread the replicates the data to the other nodes, and will not return until all
nodes have received the information.
* Asynchronous means that there is a specific 'sender' thread for each cluster node,
so the request thread will queue the replication request into a "smart" queue,
and then return to the client.
The "smart" queue is a queue where when a session is added to the queue, and the same session
already exists in the queue from a previous request, that session will be replaced
in the queue instead of replicating two requests. This almost never happens, unless there is a
large network delay.
-->
<!--
When configuring for clustering, you also add in a valve to catch all the requests
coming in, at the end of the request, the session may or may not be replicated.
A session is replicated if and only if all the conditions are met:
1. useDirtyFlag is true or setAttribute or removeAttribute has been called AND
2. a session exists (has been created)
3. the request is not trapped by the "filter" attribute
The filter attribute is to filter out requests that could not modify the session,
hence we don't replicate the session after the end of this request.
The filter is negative, ie, anything you put in the filter, you mean to filter out,
ie, no replication will be done on requests that match one of the filters.
The filter attribute is delimited by ;, so you can't escape out ; even if you wanted to.
filter=".*\.gif;.*\.js;" means that we will not replicate the session after requests with the URI
ending with .gif and .js are intercepted.
The deployer element can be used to deploy apps cluster wide.
Currently the deployment only deploys/undeploys to working members in the cluster
so no WARs are copied upons startup of a broken node.
The deployer watches a directory (watchDir) for WAR files when watchEnabled="true"
When a new war file is added the war gets deployed to the local instance,
and then deployed to the other instances in the cluster.
When a war file is deleted from the watchDir the war is undeployed locally
and cluster wide
-->
<!--
<Cluster className="org.apache.catalina.cluster.tcp.SimpleTcpCluster"
managerClassName="org.apache.catalina.cluster.session.DeltaManager"
expireSessionsOnShutdown="false"
useDirtyFlag="true"
notifyListenersOnReplication="true">
<Membership
className="org.apache.catalina.cluster.mcast.McastService"
mcastAddr="228.0.0.4"
mcastPort="45564"
mcastFrequency="500"
mcastDropTime="3000"/>
<Receiver
className="org.apache.catalina.cluster.tcp.ReplicationListener"
tcpListenAddress="auto"
tcpListenPort="4001"
tcpSelectorTimeout="100"
tcpThreadCount="6"/>
<Sender
className="org.apache.catalina.cluster.tcp.ReplicationTransmitter"
replicationMode="pooled"
ackTimeout="15000"
waitForAck="true"/>
<Valve className="org.apache.catalina.cluster.tcp.ReplicationValve"
filter=".*\.gif;.*\.js;.*\.jpg;.*\.png;.*\.htm;.*\.html;.*\.css;.*\.txt;"/>
<Deployer className="org.apache.catalina.cluster.deploy.FarmWarDeployer"
tempDir="/tmp/war-temp/"
deployDir="/tmp/war-deploy/"
watchDir="/tmp/war-listen/"
watchEnabled="false"/>
<ClusterListener className="org.apache.catalina.cluster.session.ClusterSessionListener"/>
</Cluster>
-->
<!-- Normally, users must authenticate themselves to each web app
individually. Uncomment the following entry if you would like
a user to be authenticated the first time they encounter a
resource protected by a security constraint, and then have that
user identity maintained across *all* web applications contained
in this virtual host. -->
<!--
<Valve className="org.apache.catalina.authenticator.SingleSignOn" />
-->
<!-- Access log processes all requests for this virtual host. By
default, log files are created in the "logs" directory relative to
$CATALINA_HOME. If you wish, you can specify a different
directory with the "directory" attribute. Specify either a relative
(to $CATALINA_HOME) or absolute path to the desired directory.
-->
<!--
<Valve className="org.apache.catalina.valves.AccessLogValve"
directory="logs" prefix="localhost_access_log." suffix=".txt"
pattern="common" resolveHosts="false"/>
-->
<!-- Access log processes all requests for this virtual host. By
default, log files are created in the "logs" directory relative to
$CATALINA_HOME. If you wish, you can specify a different
directory with the "directory" attribute. Specify either a relative
(to $CATALINA_HOME) or absolute path to the desired directory.
This access log implementation is optimized for maximum performance,
but is hardcoded to support only the "common" and "combined" patterns.
-->
<!--
<Valve className="org.apache.catalina.valves.FastCommonAccessLogValve"
directory="logs" prefix="localhost_access_log." suffix=".txt"
pattern="common" resolveHosts="false"/>
-->
</Host>
</Engine>
</Service>
</Server>